What’s the best rate of rise (RoR) for you?
| RI
Table of Contents
Rate of Rise – strengths and weaknesses
First, let’s get clear on the topic at hand – the Rate of Rise (RoR) is the speed at which the temperature of your beans is increasing. It’s measured over a specific period of time, usually between 30 or 60 seconds. For example, a RoR of 5 over a period of 30 seconds means that the actual bean temperature is rising 5 degrees per 30 seconds or 10 degrees per minute. Measuring increases in temperature over time is an interesting challenge as you are really measuring velocity (yes, velocity as in rockets! Coffee roasting really includes rocket science).
This is one reason Cropster users can set their preferred time expression, which defines how large the time period is for which the temperature increase is displayed. The time expression depends on your personal preference, you could compare it with the speed of a car. Are you used to looking at the speed in miles per hour or kilometers per hour? Within Cropster, you can not only select the time expression in which the speed is displayed in, but also how much detail the RoR shows with the introduction of 3 RoR settings (Recommended, Sensitive & Noise smoothing), which we cover in more detail below. One thing to keep in mind when it comes to velocity and the presentation of more detailed information – more details can bring trade-offs, and that’s mainly because of “noise” which we’ll talk about next.
Knowledge vs. noise
The RoR is a significant metric used to map and evaluate a roast, and we are proud to say it has been over 10 years since we first developed it. Like all metrics, we know it has both strengths and weaknesses. One of the strengths is the amount of knowledge it helps us gain about a particular roast, roasting techniques, staying consistent, etc. A weakness is how it relies on variable equipment (machines, probes, power supplies, etc). People roast coffee on many different setups, and that creates additional challenges.
Those equipment differences are important, especially when it comes to ‘noise’ which can be caused by the equipment itself. Some equipment presents a smoother curve based on things like type of probes, probe placement, and even connections and power (all these things can cause varying levels of electrical interference commonly referred to as ‘noise’). Understanding noise is as important as knowing your roast machine. It can change characteristics of the RoR and that can affect how you interpret the RoR when roasting. That’s why we invest in helping people understand the impact of their hardware on the data we present, and also why we have added 3 settings to Cropster to help them choose the best way to present the RoR for their roast machine.
“The new RoR system in Cropster allows roasters to customize the “noise” in their curves to strike the best balance between noise and data quality. Separating the “time expression” from the RoR Interval may help some users avoid confusion.”
Scott Rao
So what is the “perfect” RoR?
The good news: Cropster delivers the tools you need to develop a “perfect“ RoR for a particular coffee on your specific setup. The less good news: because coffees and roast machines have infinite variety, there is no universal “perfect” RoR. But that variety is why Cropster offers 3 RoR choices to help you optimize your setup: Recommended, Sensitive, and Noise smoothing. These settings give you the ability to choose the best RoR for your needs and roasting environment.
- “Recommended“: After reviewing hundreds of setups, thousands of roasts and sitting down with expert roasters, this setting delivers an outstanding balance between noise and the RoR responsiveness for most roast machine setups. It’s the default for Cropster and the starting point we recommend for all users. The assumption is that the “Recommended“ setting is the one that fits in most cases.
- “Sensitive“: We created this setting for customers with a roasting environment with little to no noise (i.e. minimal interference). The result – it presents a nearly real-time and extremely detailed RoR. You’ll need a very good setup for this setting. That’s because the faster the RoR the greater the chance you’ll see noise which presents as shakiness in the curve. Having a faster RoR setting won’t help you if you can’t distinguish spikes caused by noise from real RoR spikes within your beans. This setting makes sense for optimized roasting environments where noise has been minimized (our experts below give tips on how you can reduce noise and the shakiness of your curves).
- “Noise smoothing“: We know there are many reasons roasters face noisy curves daily. This setting is designed to help them get roasting, especially if they have been trying to remove noise but still get noisy curves. As a result, we designed a way to present an smoothed noise curve that provides the information they need so they can focus on what is going on in the machine without being distracted by noise. Our end goal, like our experts’ goal, is to help people roast and to optimize their equipment to deliver the best coffee possible from it.
“For those of us that like a slightly smoother RoR feedback loop it is great having a choice on how we want to see it & not being influenced to over correct due to too fast a feedback loop.”
Anne Cooper
Recommended vs. Sensitive
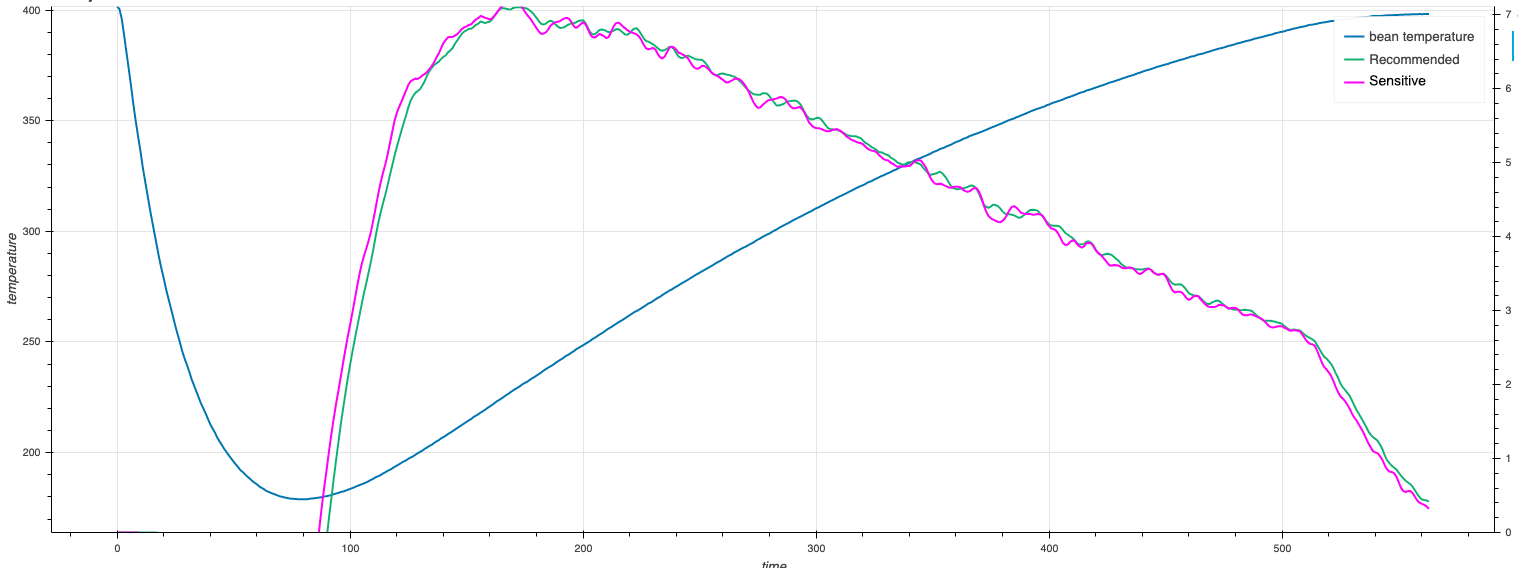
Curve 1 assumes a nearly noise-free setup that is already producing good curves. As you can see the curves are similar. However, the Sensitive curve presents several higher peaks and lower valleys. This is due to the faster RoR. If you have a Recommended curve like the green one below, Sensitive may be a better option for you because the RoR is more responsive, which means that the RoR is displayed earlier in the roast (purple curve is shifted to the left) and reacts faster to changes in the behavior of the bean temperature.

Curve 1: A solid, almost noise free roast machine setup with Recommended (Green) vs. Sensitive (Purple) RoR settings in Cropster
Curve 2 is a noisier setup. It’s still a solid curve to use for roasting, but you can see the purple Sensitive curve is now much noisier than the Recommended curve and as a result harder to read.
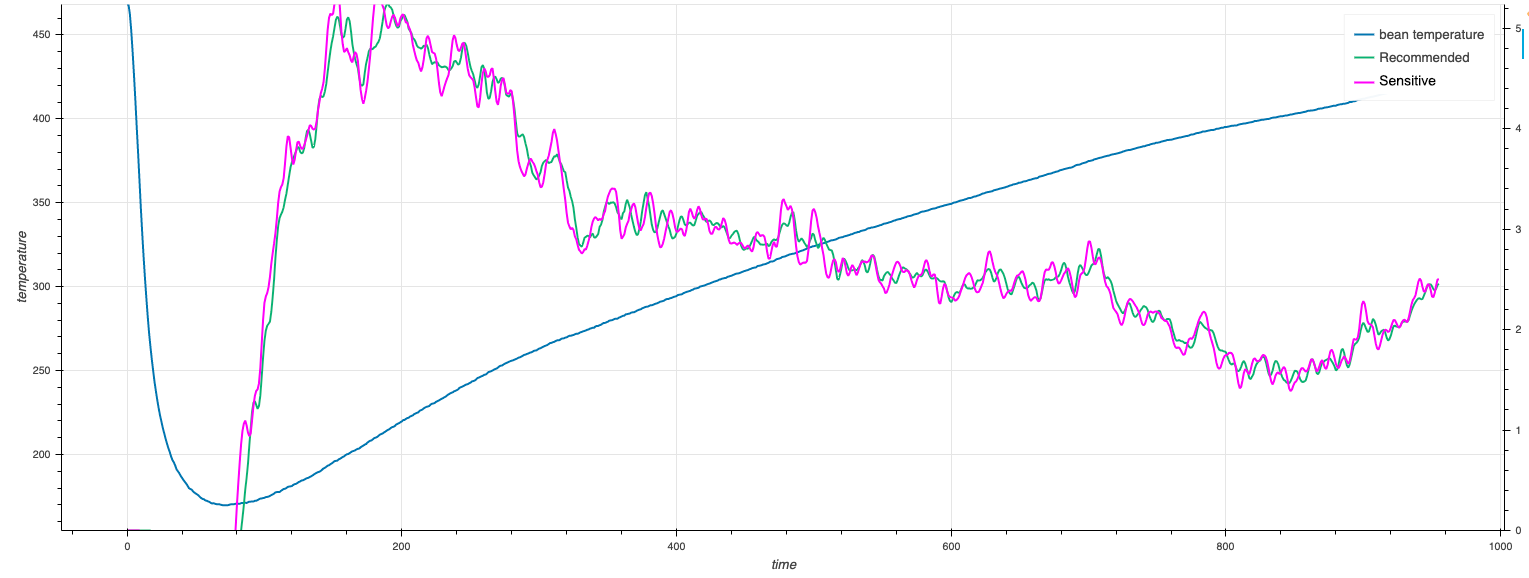
Curve 2: A noisier roast machine setup with Recommended (Green) vs. Sensitive (Purple) RoR settings in Cropster
Curve 3 is an extreme situation. There is a problem somewhere in the setup causing noise and making curve presentation extremely difficult. In this situation Sensitive makes no sense and Recommended is also not the best option (except to help you test various solutions: more on that below).
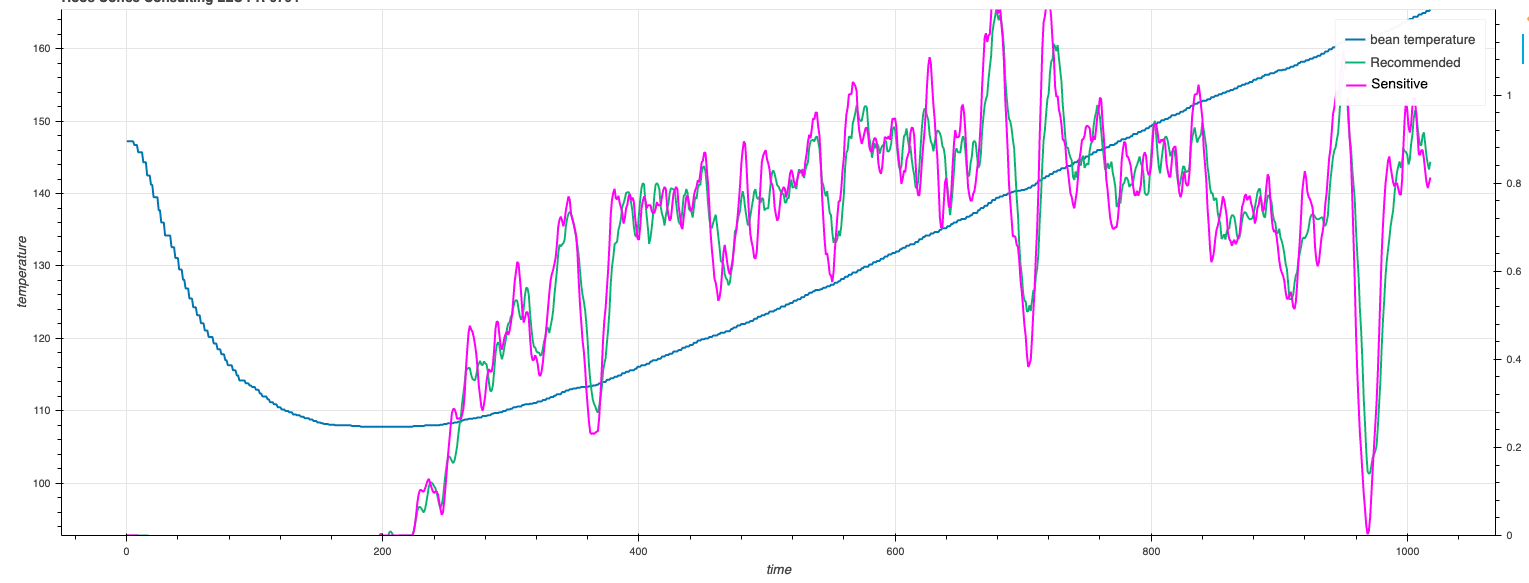
Curve 3: A noisy roast machine with clear electrical interference with Recommended (Green) vs. Sensitive (Purple) RoR settings in Cropster
Recommended vs. Noise smoothing
Next, let’s look at the Recommended vs. Noise smoothing settings.
This time we start with Curve 3 again. That’s because this is the situation where Sensitive and even Recommended are not going to help. You’ll see that Noise smoothing setting reduces the high peaks and the deep valleys and smoothes out some of the obvious noise. With this the RoR curve actually becomes readable for a roaster and makes it easier to distinguish the actual RoR curve change from noise. However, we really need to point out that if you start off with a curve like this, you should really try all the expert tips on reducing the noise in your signal first before moving to the noise smoothing option (again, more on those actions below!).
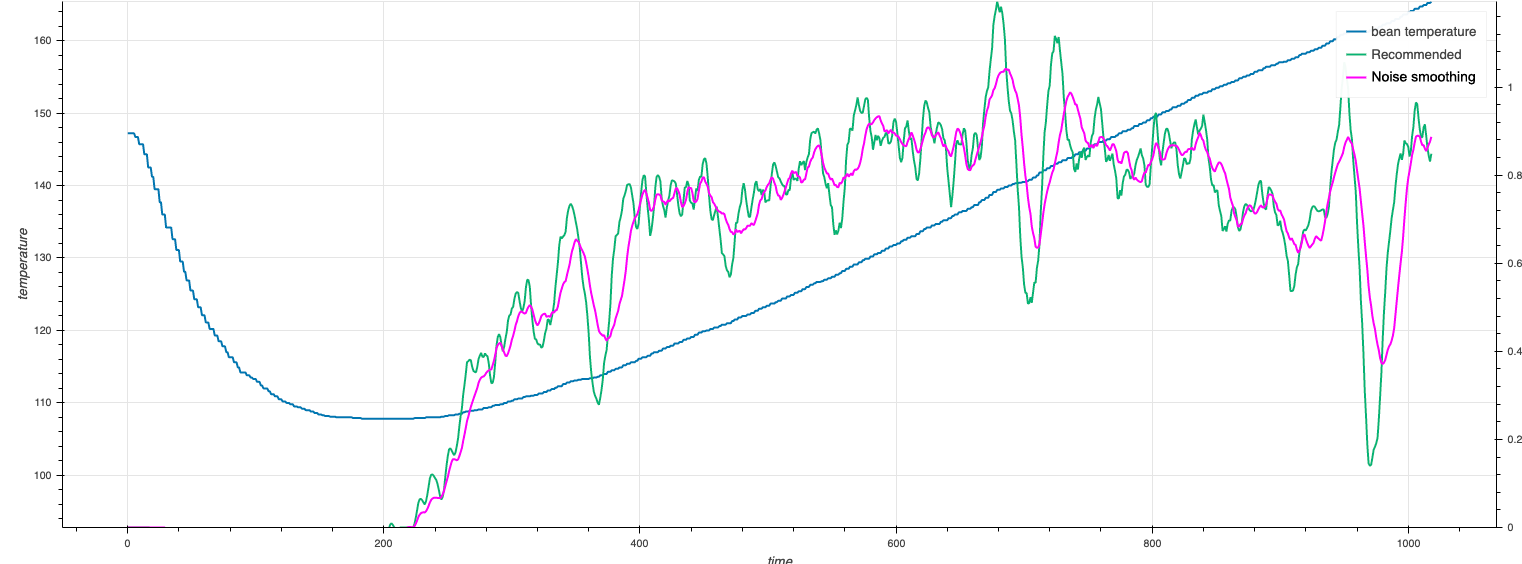
Curve 3: A noisy roast machine with clear electrical interference with Recommended (Green) vs. Noise smoothing (Purple) RoR settings in Cropster
Finally, let’s revisit Curve 1. Here, you can immediately see why Noise Smoothing creates compromises. With a good setup it reduces responsiveness, and critically it removes detail from a great curve. That’s something you’ll want to avoid as you optimize profiles.
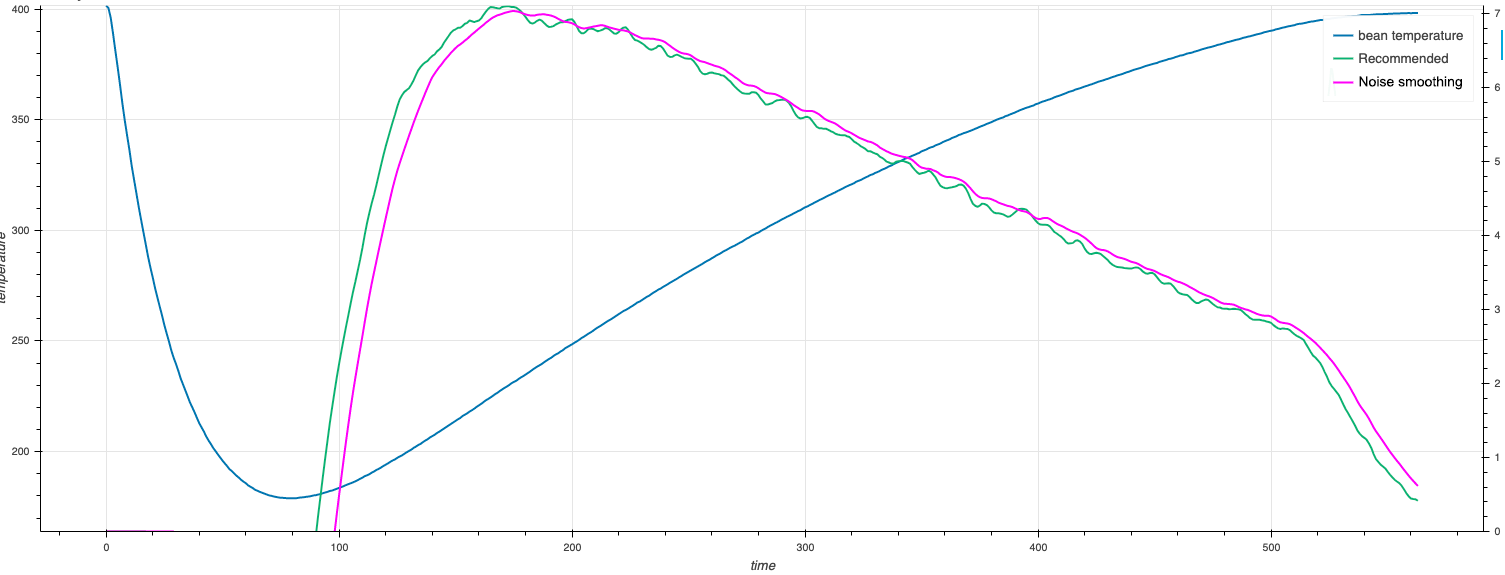
Curve 1: A solid almost noise free roast machine setup with Recommended (Green) vs. Noise smoothing (Purple) RoR settings in Cropster
As above, the Recommended option is the best fit for most setups that produce a decent initial result using average probes. Noise smoothing is designed with poor/old probes in mind but with an eye to the fact that these setups need physical checks – e.g. changing probes, isolating cables, etc. to make them produce superior results. Finally, Sensitive is designed for really solid setups and users looking to get extremely detailed information.
“I like that the data is more current during the roast. The delay from averaging has been lessened which means you have more accurate and timely data. I also like that you can do some smoothing on your own accord.”
Rob Hoos
How did Cropster develop these optimized settings?
These settings started as conversations with people who wanted more control over how their RoR was presented, but who did not want to play with settings for weeks on end or “mess with things” as they tried to optimize their setup. How many people? Hundreds. We talk to coffee experts daily, visit hundreds of roasteries (fewer in 2020…) and our data scientists did extensive analysis against roast curves from the Cropster Data Project. Based on these discussions and all the information we learned, we did an exhaustive data analysis. We also worked with roasting experts to identify a set of optimal settings that delivered what we believe to be the best solutions from both a technological and roasting experience perspective. During the process, we learned a lot. We asked some experts if we could share their insights and Anne Cooper, Rob Hoos, and Scott Rao all said yes. Here’s what they had to share:
Ask the experts: Why is the RoR so important to you?
Anne Cooper told us that looking at the RoR is super important because, “it acts like the ‘speedo’ in our cars giving us an indication of how fast or slow we are going at a particular point in the roast”. From her personal experience, she refers to the bean temperature RoR at key events because she wants to be moving at a particular rate/pace at key times/events. She also refers to the exhaust RoR as a way to help confirm when to change the gas as it cycles along from low to high accordingly in response to gas changes throughout the roast.
Rob Hoos said looking at the RoR is important because it represents another view of the bean temperature curve to use for consistency. Since the bean temperature RoR is a derivative of the bean temperature curve, it gives us another metric to track to ensure that we are being relatively consistent when roasting coffee. He also added that looking at the RoR is an important tool for coffee roasters because it helps interpret early roast data like turn around point. He told us, “If we are roasting and notice that our turn around point is higher or lower than it is on our reference curve, we can keep an eye on the bean temperature rate of rise to see if there is truly an imbalance of heat energy in the system, or something was amiss with the bean temperature readings and we have less to be fearful of.”
Scott Rao pointed out that the bean temperature RoR is important because it correlates well with roast defects, or the lack thereof. His example being, an RoR “crash” indicates baked coffee and a “flick” indicates a coffee may taste undesirably roasty. He also mentioned that he also makes use of the Exhaust Temperature RoR (ETROR), mostly as an indicator of the timing of first crack.
Ask the experts: How do you help roasters reduce noise on roast machine setups?
This is an important question as we know noise has a big impact on how the RoR information is collected and presented. It also provides us (and you) with a great list of items to check if your RoR curve is less than perfect. Here’s their list of common causes for roast machine noise:
- Electrical interference & grounding
- Probe position/thickness
- Old or cheap bean temperature probes
- Poorly placed probes
- Wires going into the Cropster Connector have become loose
- Improper settings due to experimenting
- Smaller batch sizes causing probes to read more air
Anne Cooper also pointed out that replacing the usb connection cord from the computer to the data bridge had helped her fix shaky curves. She told us re-doing the wires going into the Cropster Connector and making sure they’re all screwed in properly was something she recommended.
Rob Hoos had found setups where people ran thermocouple cables parallel to the motor power cables. He said that running those cables beside power going to a variable frequency drive motor in particular, could cause a shaky RoR. He recommends rerouting cables so they cross (ie. are perpendicular) instead of running parallel as a good approach to avoid electrical interference.
Scott Rao explained that he walks roasters through multiple possible solutions to ensure they find the source of the noise. He said some solutions that often helped included unplugging the laptop from the power while using Cropster (ie. running on battery), preventing the probe from touching the metal of the roasting machine, or using a USB isolator on the laptop end of the roast machine connection.
Ask the expert: What RoR interval setting works best when looking at a trend versus an event?
Anne Cooper told us “I always use and and show roasters how to get the best out of using a 60sec setting.” Anne added that she uses the 60sec setting as the predictor: “It is super handy having it set to 60 sec because I say to myself – if I don’t change anything, where am I going to be in a minute’s time? The 60 sec allows you to think ahead and plan your roast a lot more smoothly.”
Scott Rao prefers to choose the shortest RoR interval when looking at an event while using Cropster, such as the moment an RoR begins to crash. With the new settings, this means you can try the sensitive option, as it gives you the most-real time RoR result. But, when looking at trends in Cropster curves, Scott says he experiments with longer RoR intervals to find the shortest interval that clarifies a trend in the curve shape.
Ask the expert: What RoR setting do you suggest when looking at real-time roasting versus post-roast analysis?
Rob Hoos suggests using the most sensitive RoR that makes usable curves in both instances. He defines usable by the amount of noise you are comfortable with, and your ability to spot helpful trends within that noise.
Scott Rao also said he would use the same RoR interval for real-time roasting and post-roast analysis. He also said he would select the RoR interval based on the amount of noise in the particular system he is working with.
Ask the experts: Do you suggest a different setting for new roasters versus experienced roasters?
Anne Cooper said she would use the same setting as it is based on getting the best from the equipment. Anne added she would much rather have roasters be able to think their way through a roast based on the best information. She provided the example that this helps roasters avoid over correcting because a RoR is set too fast.
Rob Hoos also said he suggested the same settings for new and experienced roasters and emphasized finding the RoR best suited for your machine and probe setup was critical from the start.
Scott Rao also said he would use the same settings. He recommends that all roasters, regardless of experience level, seek the same optimal balance of noise vs. data quality.
Ask the experts: Final tips for roasters when it comes to the RoR.
Finally, we asked our experts if they had any additional advice for roasters when it comes to the RoR. Here’s what they shared with us:
Anne Cooper
The value/rate of the RoR at key events is more important than a super straight feedback line on the screen – there will be some wiggles & bumps along the way depending on how it is set to read in relation to your probe – but remember that it is just the feedback loop from the probe & not necessarily an accurate response of what is going on with the coffee – if there is a big drop, flat line or flick – absolutely yes you have an issue with mis-management of energy in the system & roast – but don’t give yourself a hard time if your line, with appropriate declining energy, is not completely straight – there are a lot of factors contributing to how that line ends up on your screen!! Be nice to yourself!! 😉
Rob Hoos
I would like to remind roasters that it is a tool in their arsenal. I would also like to encourage them (despite this being a blog post for Cropster) that a probe can only tell you the temperature of itself, and that the rate of rise is dependent on that probe being free of noise etc. While bean temperature and RoR are fabulous tools for you to use to aim for quality and consistency they will never be perfect representations of the actual bean surface or bean core temperature. Therefore they cannot ever fully replace looking at, smelling, and understanding your coffees as they roast. It’s a “both and” as opposed to an “either or”.
Scott Rao
I’d like to add that if a roaster has a lot of noise in his or her system, it’s best to find and fix the source of the noise rather than simply smoothing out the noise by using a higher RoR interval. Most noisy RoRs can be fixed quickly and for very low or no cost, it just takes a little testing to find the source. Often fixing data noise is the first thing I do with new clients to ensure we are working with quality data.
To conclude, we’d like to say a huge thank you to all the roasters, coffee experts and in particular Anne, Rob, and Scott for all their help creating these new settings within Cropster. At Cropster we believe that by sharing what we learn everyone gets better and importantly, everyone gets a better cup of coffee! We hope this information has helped you.

